Home safety is paramount. Traditional smoke detectors, while effective, often lack the intelligence and connectivity to provide real-time alerts and automated responses. This is where Home Assistant and Alarmo come in. By integrating smart smoke detectors into your Home Assistant setup, you can elevate your home’s security to a whole new level.
Myself, I am working with the Frient Smoke Detectors (Amazon affiliate Link). Those are fulfilling the standards EN 14604, DIN 14676 which are needed for private households in Europe. In addition they are measuring temperature and the siren can be turned on and off manually via Zigbee2MQTT.
So my full setup contains the following:
- Frient Smoke Detector
- Sonoff Zigbee Dongle Plus
- HP mini with HomeAssistant OS
Why Smart Smoke Detection?
Smart smoke detectors offer a myriad of advantages over traditional ones:
- Real-time Alerts: Receive instant notifications on your phone or other devices, ensuring you’re always informed, even when you’re away.
- Remote Monitoring: Check the status of your smoke detectors from anywhere in the world.
- Automated Responses: Set up automated actions like turning on lights, opening windows, or activating a specific scene to mitigate risks.
- Enhanced Security: Combine smoke detection with other security measures for a comprehensive home security system.
Alarmo
Streamline Smoke Detection with Home Assistant using Alarmo: Effortless Management
Alarmo, a powerful Home Assistant integration, simplifies managing alarms within your smart home. Eliminate the need for intricate automations and gain control of your security system with ease.
Easy Installation via HACS
Getting started is a breeze! If you haven’t already, install Alarmo through HACS (Home Assistant Community Store).
Comprehensive Installation Guide
For a detailed installation guide, head over to the Alarmo GitHub repository: link to Alarmo GitHub repository.
Setup Alarmo
Area
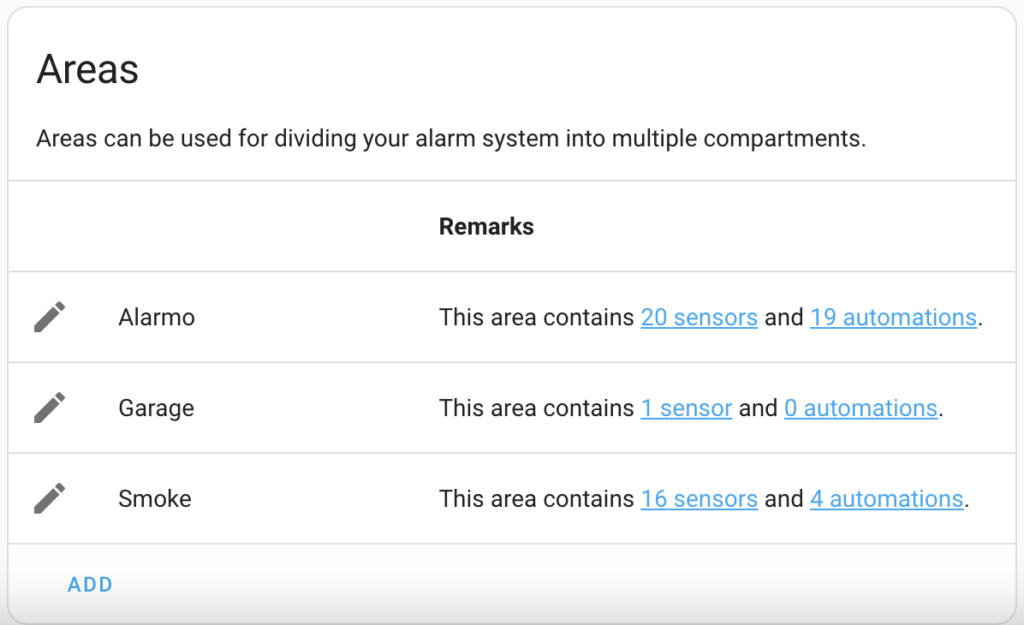
Primarily designed for door and window sensor integration, Alarmo can also be a powerful tool for enhancing your home’s smoke detection capabilities. By creating a dedicated “Smoke Detector” area within Alarmo, you can centralize the management of your smoke sensors, streamlining your home security system.
Scroll down until you can see the Area section. Click Add on the Bottom, enter a name (in my case Smoke) and leave the copy settings from blank.
Sensors
Next, navigate to the Sensors tab within Alarmo. You’ll see a comprehensive list of all your Home Assistant devices compatible with Alarmo.
Select and Add Your Smoke Detectors:
- Choose Your Devices: Carefully select all your smoke detectors from the list.
- Add to Alarmo: Click the Add button at the bottom of the page to incorporate your selected smoke detectors into Alarmo.
Customize Your Smoke Detector Settings:
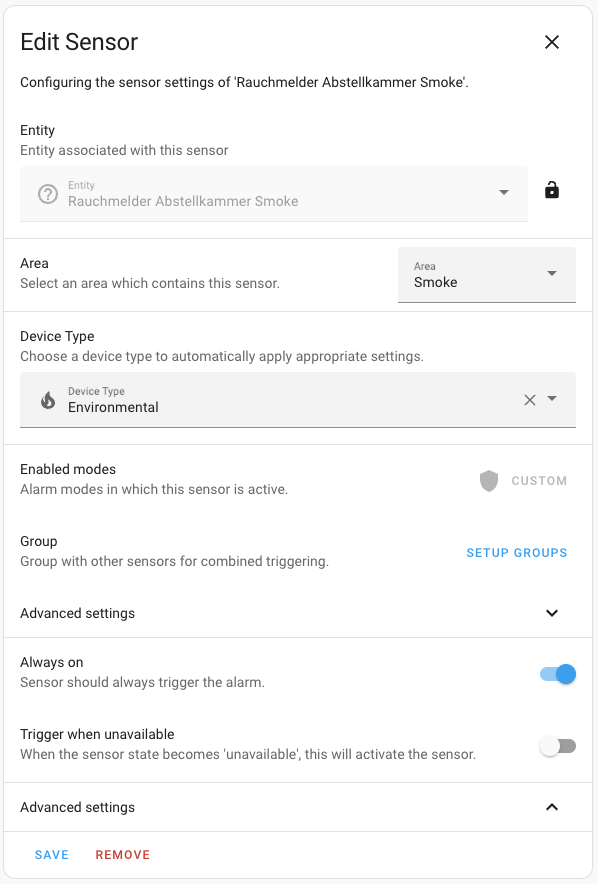
Once added, click on each smoke detector individually to fine-tune its settings. The most crucial step is to assign the Area you created earlier, ensuring accurate alarm triggers and notifications.
Actions
Configure Alarms and Notifications in Alarmo
To ensure you’re promptly alerted in case of an alarm, you’ll need to set up specific actions within Alarmo’s Actions tab. This tab is divided into two key sections:
Notifications:
- Who to Notify: Determine who should receive alerts (e.g., yourself, family members, emergency contacts).
- When to Notify: Specify the timing and frequency of notifications.
Actions:
- What to Do: Define the actions to be taken in response to different alarm types.
Setup a Notification
Setting up a notification within Alarmo is quite easy. all you ned to do is clicking on New Notification in the Notification section. Below an example of the fire notification I have set up.
Event must be “Alarm is triggered“. Keep in mind that for smoke sensors, Alarmo goes straight into this mode and not as for an intrusion alert where you have a pending mode in order to be able to deactivate the alarm system when coming home.
Select the smoke area you created before. In my case this is “Smoke”. The Mode can be left blank since this is not applicable for smoke alerts.
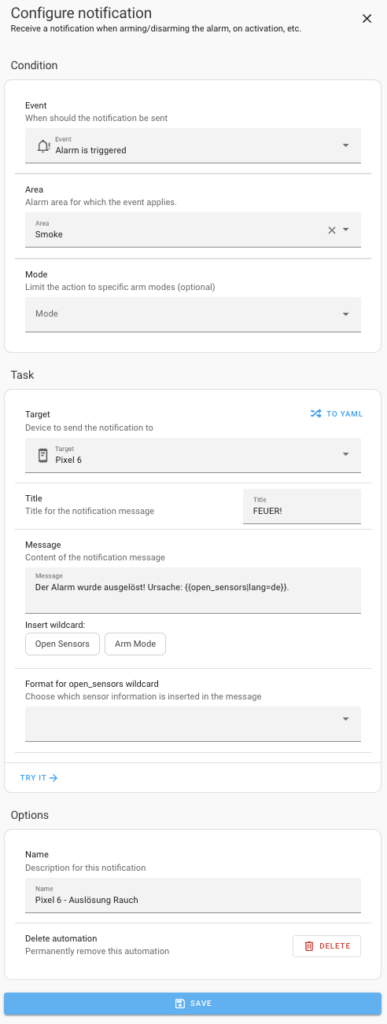
In the Task section you need to setup which device will get the notificaiton and the content of the message you will receive.
As a Title I have set up “Feuer”, so fire in german in order to immediately know what the notification is about when receiving it. And for the content itself I have “The alarm has been triggered !” (Der Alarm wurde ausgelöst in the screenshot) and Reason (Ursache in the screenshot) with {{open_sensors|lang=de}} which allows me to receive information what sensor has triggered the alert. lang = de sets the language to german for this wildcard part.
By clicking on try it you will receive a test notification with this content.
Setup a Task
Next, let’s set up a Task. So what should be done in case of an alert. Again, we need to select “Alarm is triggered” as an event and “Smoke” as the Area.
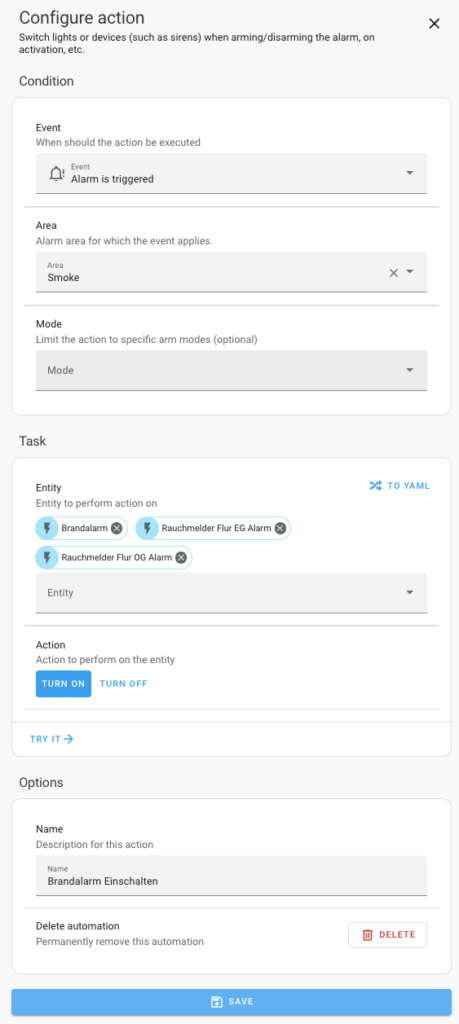
As a Task I have setup to turn on “fire alarm” (Brandalarm in the screenshot) which is turning on a helper (needed to activate a shutter function on my KNX system which opens all shutters around the house as soon as it turns on). The Sirene of the smoke alert in the hallway up and downstairs. This allows me to hear the incident even it is happening in the technical room during night while I am sleeping.
Conclusion
Et voila! You are done.
Of course, you can extend the notifications or task to your needs. Like for example turning on some lamps during night. Or if you have an siren with alert LED on the outside, this could be turned on in order to show the neighbours that something is wrong.
In any case, if you are home or not, you will be alerted that something is wrong at home!
Alarmo is not only usable with Smoke Detectors but can also be extended by Gas or Moisture sensors.
Find a list of all the products I am using here
Leave a Reply